Learn how to replace the iPhone 6 Plus’s display assembly. This assembly comes pre-installed with the front-facing camera, earpiece speaker, and sensor cables, making it easy to replace.
All you need to do is remove the old display assembly and install the home button and new display assembly to ensure Touch ID functionality.
Step 1:Pentalobe Screws

Before disassembling your iPhone, discharge the battery below 25%. A charged lithium-ion battery can catch fire and/or explode if accidentally punctured.
Power off your iPhone before beginning disassembly.
Remove the two 3.6 mm-long P2 Pentalobe screws next to the Lightning connector.
Step 2:Taping the display

If your phone’s display is cracked, prevent further breakage and avoid bodily injury while taping the display glass for repairs.
Alternate layers of clear packing tape to completely cover the entire display.
Wear protective glasses to protect your eyes from flying glass shards during the repair.
If the cracked display glass makes it difficult to secure the suction cup in the following steps, try folding a stronger tape (such as pipe tape) into a handle to lift the display.
Step 3:Procedure for using reverse clamps

Pull the blue handle toward the hinge to release the reverse clamp from separation mode.
Slide the support arm over the left or right edge of the iPhone.
Apply two suction cups to the screen above the home button—one on the front and one on the back (the front is where the screen faces you).
Press the top suction cup down to apply suction.
If the surface of the reverse clamp feels too slippery or unstable, use some tape to create a firmer grip.
Step 4

Pull the blue handle forward to lock the arms.
Twist the handle clockwise 360 degrees until the suction cup begins to stretch.
Make sure the suction cups remain aligned. If they begin to slip out of alignment, loosen the suction cups slightly and realign the arms.
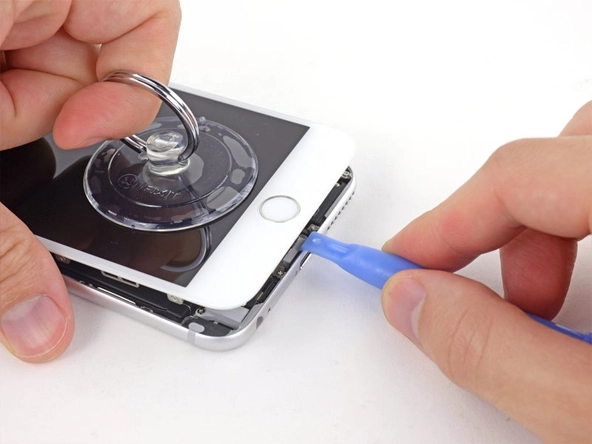
When the reverse clamp creates a sufficient gap, insert the opening pick under the screen.
Step 5

Pull up on the home button end of the front panel assembly, using the top of the phone as a hinge.
Open the display to a 90° angle and lean it against something as shown.
Use a rubber band to secure the display to the case. This prevents unnecessary strain on the display cables.
Step 6

Holding the front panel upright about 90 degrees, remove the five Phillips screws securing the front panel cable bracket.
Three 1.2 mm screws
One 1.7 mm screw
One 3.1 mm screw
Step 7

In the next four steps, use the flat end of a spudger to pry only on the cable connectors, not on their sockets.
Use the flat end of a spudger to disconnect the front camera and sensor cable connector.
Use the flat end of a spudger to disconnect the home button cable connector.
Use the flat end of a spudger to disconnect the display cable connector.
Step 8

Remove the two 1.8mm Phillips screws securing the home button cover to the front panel.
Remove the home button cover from the front panel.
Use the tip of a spudger to disconnect the home button cable from the front panel.
Pull up and remove the home button cable from the front panel.
Step 9: Screen Assembly

Touch ID only works with your original phone’s home button, so you’ll need to reassemble your home button from your original display assembly to the new one to continue using Touch ID.
Your replacement part may already have an extra Phillips screw installed to the left of the home button. Remove the unnecessary screw to reinstall the home button bracket.
After reassembling the button, clean the touchscreen surface with alcohol before reinstalling it into the iPhone. Alcohol can eliminate any static electricity that may affect the display.
After reassembly, connect the charging cable to your iPhone before powering it on. Once the iPhone has successfully powered on, disconnect the charging cable.