If your iPhone 13 Pro Max screen is cracked, unresponsive to touch, or doesn’t display images when you power it on, use this guide to restore your iPhone to normal operation using a new screen (also known as a display component).
Note: In iOS 17.6 and earlier, True Tone and Auto Brightness are disabled after screen replacement, even with a genuine Apple screen. Face ID is also disabled unless your iPhone is running iOS 15.2 or later. In iOS 18 and later, you can calibrate your new screen using Apple’s official Repair Assistant tool, thus restoring True Tone functionality to a genuine Apple-purchased screen.
Step 1:Pentalobe Screws

Note: Before proceeding, reduce your iPhone battery to below 25%. Accidental puncture could cause a charging lithium-ion battery to catch fire and/or explode.
Power off your iPhone before beginning disassembly.
Remove the two 6.8mm long pentagonal P2 screws located on the bottom edge of your iPhone.
Opening the iPhone display will compromise its water seal. Have a spare seal prepared before performing this step, or if reassembling the iPhone without replacing the seal, take care to avoid liquid exposure.
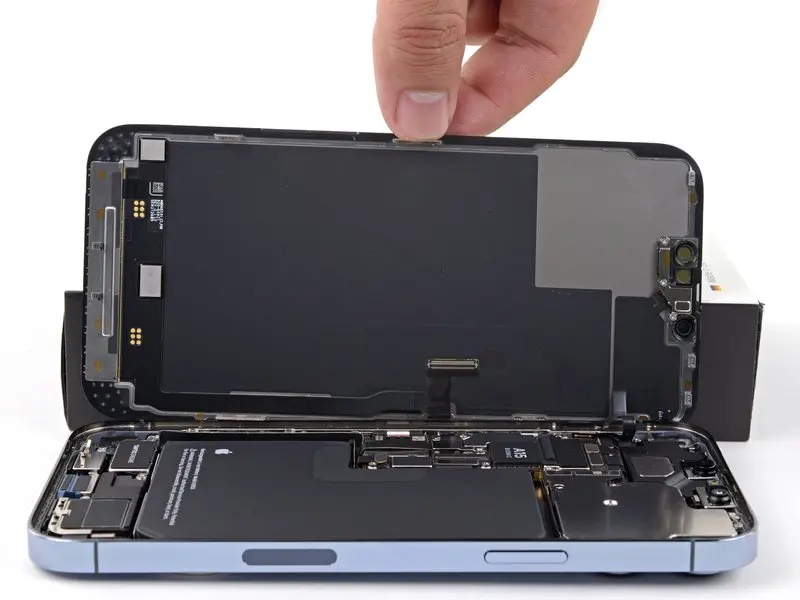
Step 2: Gently lift the screen
")
Use the suction cup at the bottom edge of the phone, avoiding the edge of the glass.
Pull the suction cup upwards with steady, constant pressure to create a tiny gap between the front panel and the back cover.
Insert the pry tool into the gap.
The waterproof adhesive between the screen and the bezel is very sticky and requires considerable force to pry open even slightly. If you have difficulty opening the gap, continue heating and gently shake the screen up and down to soften the adhesive strip until a sufficient gap is created to insert the tool.
Step 3: Separate the adhesive on the right.
")
Slide the triangular pry tool along the bottom right corner of the iPhone to loosen the glue.
Continue sliding upwards along the right edge of the iPhone until you reach the top right corner.
Do not insert the pry tool more than 3 mm into the iPhone, as this may damage internal components.
Leave the pry tool in the top right corner of the phone before proceeding.
Step 4: Cut open the waterproof adhesive on the left side
")
Insert the second triangular pry tool into the bottom left corner of the iPhone.
Twist both pry tools simultaneously until the latch on the left side releases.
The twisting action should be gradual.
If the waterproof adhesive is difficult to remove, you can heat the left edge again.
Step 5: Open iPhone
")
Remove the suction cups from the screen.
Pinch the display upwards from the right side to open the iPhone, like a book cover.
Do not attempt to completely detach the display yet, as several fragile ribbon cables still connect it to the iPhone’s motherboard.
While using your phone, prop the display against something for support.
During reassembly, place the display in place, align the clips along the top edge, and carefully press the top edge into place, then snap the rest of the display down. If it doesn’t snap easily into place, check the clips around the display to ensure they are not bent.
Step 6: Remove the battery interface cover
")
Use a Y000 screwdriver to remove the three 1.3 mm screws securing the battery connector cover.
Throughout the repair process, trace each screw and ensure it is accurately returned to its original position to avoid damaging your iPhone.
During reassembly, this is a good time to open the iPhone and test all functions before sealing the display in place. Always ensure the iPhone is completely powered off before continuing.
Step 7: Disconnect the battery
")
Use a pointed pry bar or a clean fingernail to pry the battery connector off the socket on the motherboard.
Try not to damage the black silicone seals surrounding this connector and its connection to other circuit boards. These seals provide extra protection against water and dust.
Slightly bend the connector away from the motherboard to prevent it from accidentally contacting the socket and powering the phone during repairs.
Step 8: Disconnect the monitor cable.
")
Use the tip of a pry bar to pry the connector vertically upwards from its socket, thus disconnecting the first display cable.
To reconnect such a crimp connector, carefully align and press down on one side until it clicks into place, then repeat on the other side. Do not press down on the middle. If the connector is misaligned, the pins will bend, causing permanent damage.
Step 9: Unscrew the front sensor interface cover.
")
Use a Y000 screwdriver to remove the two 1.1 mm screws from the front sensor interface cover.
Use a Phillips screwdriver to remove the remaining two screws from the front sensor interface cover:
One 1.5 mm screw
One 1.8 mm screw
Step 10
")
Removing the Screen
If you wish to replace the screen adhesive during the reassembly process, please pause here.