If your iPhone 14 screen is cracked, unresponsive to touch, or doesn’t display images when powered on, use this guide to replace the screen and save your iPhone.
This guide uses the A2882 (internationally compatible) model. If you are repairing a different iPhone 14 model, your phone may look slightly different, but the process should be the same.
Note: In iOS 17.6 and earlier, True Tone and Auto Brightness will be disabled after screen replacement, even if you replace it with an original Apple screen. Face ID will also be disabled unless your iPhone is running iOS 15.2 or later. In iOS 18 and later, you can use Apple’s Repair Assistant tool to calibrate the new screen and re-enable True Tone for Apple original parts.
When reassembling the device, you will need to replace the adhesive to reconnect the battery and screen. Your device will function normally, but you will likely lose its casing IP (intrude protection).
Step 1:Pentalobe Screws

Please turn off your phone before removing the screws.
Remove the two 3.4 mm long P2 pentalobe screws at the bottom of the phone.
Step 2: Insert the triangular pry bar.
")
Place the suction cup at the bottom of the screen, avoiding the very edge of the back cover.
Pull up the suction cup with firm, consistent pressure to create a small gap between the screen and the outer bezel.
Insert the pry tool into the gap below the plastic bezel of the screen.
The glue holding the screen in place is very strong; creating this initial gap requires considerable force. If it’s difficult to create a gap, apply more heat and gently shake the back cover up and down to soften the glue until you’ve created a gap large enough to insert the pry tool.
Step 3: Heat the right side
")
Heat the right edge of your iPhone with a hairdryer for 90 seconds, or until the screen is slightly warm to the touch.
Step 4: Cut open the glue on the right edge.
")
Slide the triangular pry tool along the bottom right corner of the iPhone to loosen the glue.
Continue sliding upwards along the right edge of the iPhone until you reach the top right corner.
Do not insert the pry tool more than 3 mm into the phone, as this may damage internal components.
Leave the pry tool in the top right corner of the phone before proceeding.
Step 5: Cut open the glue on the left side.
")
The ribbon cable on the left side of the screen is easily damaged by the pry tool. Follow this alternative procedure to pry open the glue on the left side.
Insert the second triangular pry tool into the bottom left corner of the iPhone.
Twist both pry tools simultaneously until the clip on the left side loosens.
Apply twisting force gradually.
If you have trouble separating the glue, reheat the left edge.
Step 6: Turn on your phone
")
Remove the suction cup from the screen.
Rotate your iPhone so that the right side of the phone is facing you.
Open the phone from the right side upwards like turning the pages of a book.
When repairing the phone, rest the screen against an object for support.
If you don’t have anything to support the phone, you can use the suction cup as a phone stand.
Step 7: Loosen the screws on the screen connector cover.
")
Use a Y000 screwdriver to remove the 0.8 mm long screws securing the screen interface cover.
Throughout the repair process, keep every screw safe and ensure they come back to where they came from to avoid damaging your device.
During the reassembly process, this is the best time to open the iPhone and test all functions before sealing the display in place. Always ensure the iPhone is completely powered off before continuing the repair.
Step 8: Disconnect the screen.
")
Use the tip of a pry bar to pry the connector vertically upwards from its socket, thus disconnecting the screen cable.
To reconnect a push-button connector like this, carefully align it and press down on one side first until it clicks into place, then press on the other side. Do not press the middle of the connector. Pressing the middle if the connector is misaligned may bend the pins underneath, causing permanent damage.
Step 9: Loosen the front sensor interface cover.
")
Use a Y000 screwdriver to remove the 0.9 mm long screws securing the front sensor interface cover.
Step 10: Disconnect the front sensor interface cable.
")
Use the tip of a pry bar to pry the interface vertically upwards from its socket, thereby disconnecting the front sensor cable.
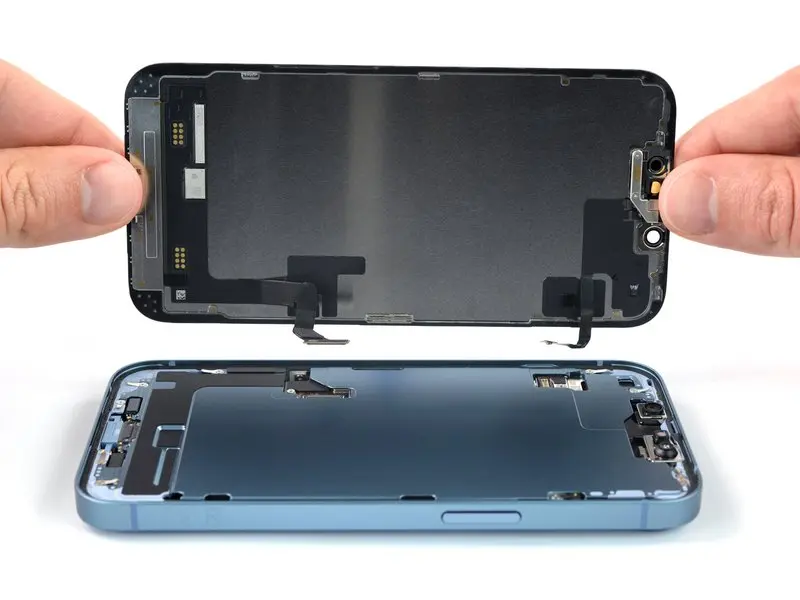
Step 11: Remove the screen
")
Remove the screen.
Clean the affected area with alcohol (>90%), then apply new adhesive where necessary.