You can use the following guide to replace your iPhone X’s OLED screen panel. Replacing the screen may also resolve your iPhone’s “won’t turn on” issue.
Note: The earpiece speaker and sensor assembly behind the screen is factory-matched to your iPhone, so you must follow the instructions below to remove this assembly from your old screen and reinstall it on your new one.
This includes the floodlight sensor used for biometric security, Face ID. If this assembly is damaged or replaced, you won’t be able to use Face ID, so be extra careful to protect it during the screen replacement. If damaged, only Apple can repair it.
Step 1:Pentalobe Screws
")
Before beginning, discharge your iPhone battery below 25%. A charged lithium-ion battery can catch fire or explode if accidentally punctured.
Power off your iPhone before beginning disassembly.
Remove the two 6.9mm long Pentalobe screws at the bottom of the iPhone.
If any screws are stripped or damaged, replace them.
Disassembling the iPhone’s display will compromise its waterproof seals. Prepare new seals before performing this step, or reassemble the iPhone without replacing the seals. Avoid exposing the iPhone to liquids.
Step 2
")
If using a single suction cup, apply it to the bottom edge of the phone, avoiding the curved portion of the glass.
Step 3
")
Firmly pull up on the suction cup to create a slight gap between the front panel and the rear case.
Insert the opening pick into the gap beneath the plastic bezel of the display, not into the display itself.
The watertight adhesive holding the display in place is very strong; creating this initial gap requires considerable force. If you’re having a hard time opening a gap, apply more heat and gently rock the screen up and down to weaken the adhesive until enough of a gap is created to insert your opening pick.
Step 4
")
Slide the opening pick up along the lower left edge of the iPhone, cutting the adhesive securing the display.
Don’t insert the opening pick more than 3 mm, or you may damage internal components.
Step 5
")
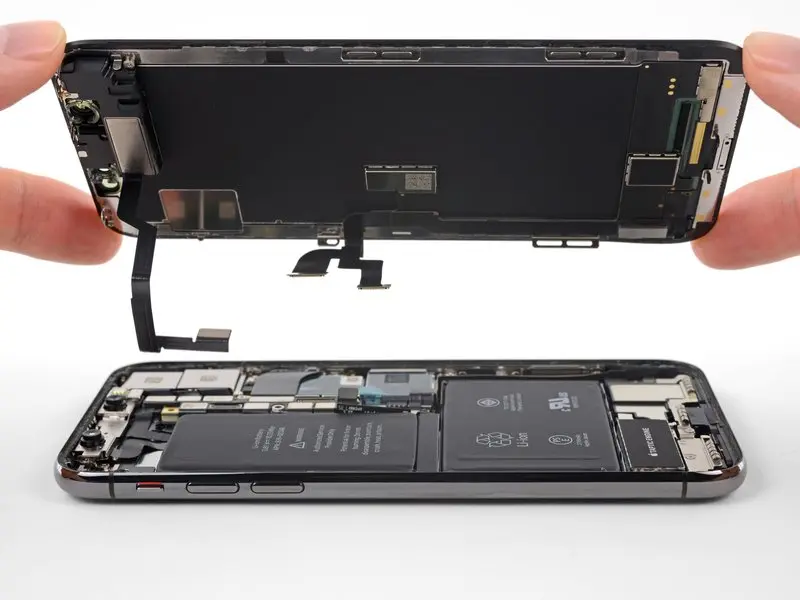
Open the iPhone by lifting up from the left side of the display, like opening the back page of a book.
Don’t try to completely separate the display from the phone, as several fragile cables remain connected to the iPhone’s control board.
Be sure to separate the display frame along with the display, as shown in the picture, and not remain stuck in the phone.
During reassembly, lay the display in place, align the clips along the top edge, and carefully press the top edge into place before tightening the rest of the way down. If it doesn’t snap easily into place, check the clips around the perimeter of the display to make sure they aren’t bent.
Step 6
")
Remove the five Y000 screws securing the logic board bracket.
Three 1.1mm screws
One 3.1mm screw
During this step, remember each screw’s position and re-install it precisely to prevent damage to the camera.
One 3.7mm screw
Step 7
")
Use the tip of a spudger or a clean fingernail to pry the battery connector off the logic board.
Try to avoid damaging the black silicone sealant around the logic board or other boards; it provides enhanced water and dust resistance.
Gently pry the connector open to prevent the logic board from accidentally connecting to the battery. Power on the phone.
Step 8
")
Remove the display assembly.
During reassembly, pause here if you wish to replace the waterproof adhesive around the edges of the display.