If your iPhone XR screen is cracked, unresponsive to touch, or displays no image when powered on, use this guide to restore your iPhone to working order. This requires a new screen, also known as a display assembly.
This guide is for complete screen replacements only. The replacement screen should already be attached to the frame and have a thin metal LCD shield pre-attached to the back. If the LCD shield is missing, follow this more detailed guide to replace the screen while retaining your original LCD shield.
The combined earpiece speaker and sensor assembly, affixed to the back of the display, is factory-paired with your iPhone and must be transferred from the old display to the new one when replacing the display. It contains the flood illuminator, which is part of the biometric Face ID security feature. If damaged or replaced, Face ID will cease to function, so be extremely careful not to damage any of these components during this procedure. If damaged, only Apple can restore Face ID functionality.
Step 1:Pentalobe Screws

Before beginning, discharge your iPhone’s battery below 25%. A charged lithium-ion battery can catch fire and/or explode if accidentally punctured.
Power off your iPhone before beginning disassembly.
Remove the two 6.7mm-long Pentalobe screws at the bottom edge of the iPhone.
Opening the iPhone will compromise its waterproof seals. Have replacement seals available before completing this step, or take precautions to avoid liquid exposure if you reassemble your iPhone without replacing the seals.
Each Pentalobe screw has a black rubber gasket under its head. For maximum protection against dust and liquid ingress, inspect the gasket or replace the screws during reassembly.
Step 2
")
If using a single suction handle, apply it to the bottom edge of the phone, being careful to avoid the curved edge of the glass.
Step 3
")
Gently pull up on the suction cup with firm pressure to create a small gap between the glass front panel and the metal case.
Insert the opening pick underneath the screen and plastic frame, not the screen itself.
The watertight adhesive securing the screen is very strong; creating this gap may require considerable force. If you’re having difficulty separating the screen from the back cover, continue applying more heat and gently pull on the screen to loosen the adhesive until you create enough of a gap to insert a plastic opening pick.
Step 4:Separating the display adhesive
")
Slide the opening pick from the bottom left corner to the top left corner to break the adhesive securing the display.
Do not insert the opening pick more than 3 mm, as this may damage internal components.
Step 5
")
Pull on the small nub on the suction cup to remove it from the front panel.
Step 6:Open your iPhone
")
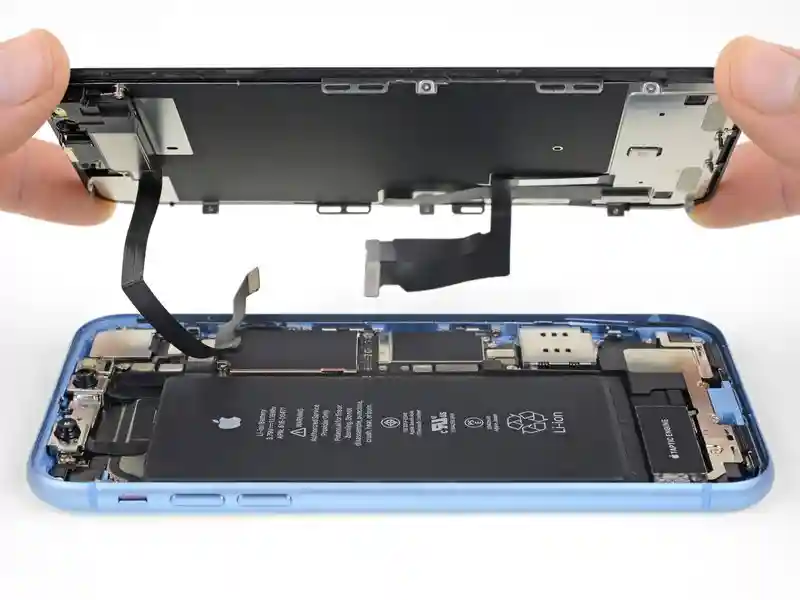
Open your iPhone by swinging the display up from the left edge, like the back cover of a book.
Do not fully separate the display panel at this step, as several cables are still attached to the logic board.
Lean the display panel against something for support while you work.
During reassembly, lay the display in place, align the clips along the top edge, and carefully press the top edge into place before lowering the rest of the display. If it doesn’t snap back properly, inspect the clips around the edge of the display and make sure they aren’t bent.
Step 7:Unscrew the battery connector bracket
")
Remove the three 1.2mm Y000 screws securing the battery connector cover.
Remove the cover.
Throughout this repair, remember to keep track of each screw and do not lose it. When reassembling your phone, make sure all screws are fully seated, or you risk damaging your phone.
During reassembly, it’s a good idea to power on your iPhone and test all functions before sealing the display. Be sure to completely power off your iPhone before continuing.
Step 8:Removing the battery
")
Use the tip of a spudger to pry the battery connector straight up out of its socket.
Try not to damage the black silicone seals around this connector and the other circuit board connectors. These seals provide additional protection against water and dust intrusion.
Bend the connector slightly away from the logic board to prevent the battery from accidentally making contact with the socket and providing power to the phone during your repair.
Step 9:Unscrew the display cable cover
")
Remove the two 1.2 mm Y000 screws securing the display connector bracket.
Remove the bracket.
Step 10:Disconnecting the digitizer
")
Use the pointed end of a spudger to pry up the digitizer cable.
To reconnect a cable connector like this one, carefully align it and press down on one side until it snaps into place, then repeat on the other side. Do not press down on the center. If the connector is misaligned, the pins can bend, causing permanent damage.
If any part of the screen becomes unresponsive to touch after your repair, disconnect the battery and reinstall the connector, making sure it snaps fully into place and that there’s no dust or other obstructions in the slot.
Step 11:Remove the display assembly
")
Remove the display assembly.
During reassembly, if you need to replace the waterproof adhesive around the edges of the display, pause and review this guide.