If your iPhone 11 Pro Max screen is cracked, unresponsive to touch, or won’t display an image when powered on, use this guide to restore your iPhone to working order. A new screen, also known as a display assembly, will be required.
The combined earpiece speaker and sensor assembly affixed to the back of the display is factory-paired with your iPhone, so you must follow the instructions below to transfer it from your old display to your new one during a display replacement. It contains the flood illuminator, which is part of the biometric Face ID security feature.
If it is damaged or replaced, Face ID will stop working, so be extremely careful not to damage any of these components during the process. If damaged, only Apple can restore Face ID functionality.
Step 1:Pentalobe Screws

Before beginning, discharge your iPhone’s battery below 25%. A charged lithium-ion battery can catch fire and/or explode if accidentally punctured.
Power off your iPhone before beginning disassembly.
Remove the two 6.7mm-long Pentalobe screws at the bottom edge of the iPhone.
Opening the iPhone will compromise its waterproof seals. Have replacement seals available before completing this step, or take precautions to avoid liquid exposure if you reassemble your iPhone without replacing the seals.
Step 2
")
If you’re using a single suction handle, apply it to the bottom edge of the phone, avoiding the curved portion of the glass.
Step 3:Gently lift the screen
")
Pull up on the suction cup with firm, constant pressure to create a slight gap between the front panel and rear case.
Insert the opening pick underneath the screen and the plastic frame, not into the screen itself.
The watertight adhesive holding the display in place is very strong; creating this initial gap requires a considerable amount of force. If you have difficulty creating a gap, continue applying more heat and gently rock the screen up and down to separate the adhesive until enough of a gap is created to insert your opening pick.
Step 4:Separating the display adhesive
")
Slide the opening pick along the bottom edge of the phone, moving it up the left edge and toward the volume control buttons and silent switch, breaking up the adhesive securing the display.
Don’t insert the opening pick more than 3mm, as this may damage internal components.
Step 5: Turn on your phone
")
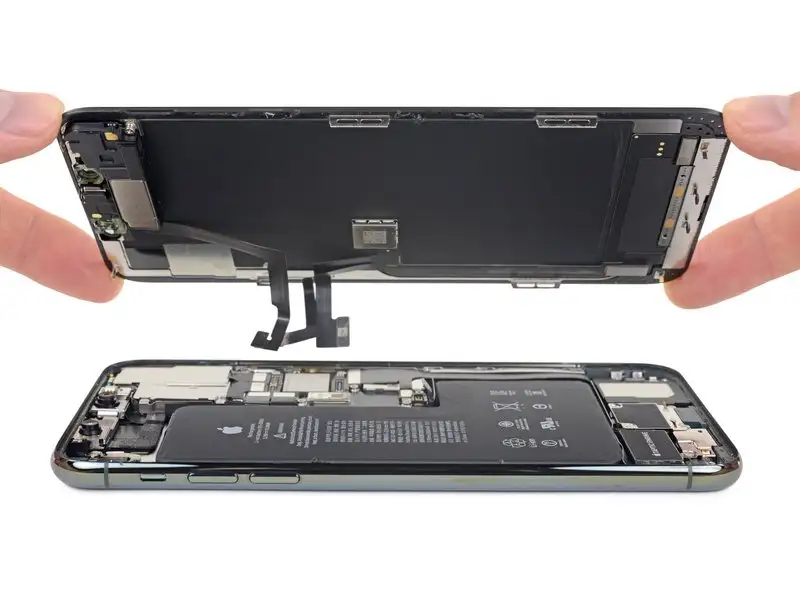
Gently flip the display up from the left side of the phone, like the back cover of a book.
Don’t try to completely separate the display yet, as fragile ribbon cables still connect it to the logic board.
Prop the display against something to keep it propped up for the next step.
During reassembly, lay the display in place, align the clips along the top edge, and carefully press the top edge into place before lowering the rest of the display. If it doesn’t snap easily into place, check the condition of the clips around the perimeter of the display and make sure they aren’t bent.
Step 6: Unscrew the battery connector cover
")
Remove the two 1.3mm-long Y000 screws securing the battery cover bracket.
Throughout this repair, pay close attention to each screw’s placement and ensure they return to their original path to avoid damaging your iPhone.
During reassembly, this is a good time to power on your iPhone and test all functions before sealing the display in place. Be sure to completely power off your iPhone before continuing.
Step 7: Disconnect the battery
")
Use a plastic opening tool or a clean fingernail to pry the battery connector up from its socket on the logic board.
Try not to damage the black silicone seals around this connector and other circuit board connectors. These seals provide additional protection against water and dust intrusion.
Bend the connector slightly away from the logic board to prevent it from accidentally making contact with the socket and providing power to the phone during your repair.
Step 8: Remove the logic board cover screws
")
Use a Y000 screwdriver to remove the six 1.3 mm screws securing the logic board cover bracket.
Step 9: Disconnect the OLED display cable
")
Use a plastic opening tool or a fingernail to disconnect the OLED panel cable connector.
To reinstall a press-on connector like this one, carefully align and press down on one side until it clicks into place, then repeat on the other side. Do not press down in the middle. If the connector is misaligned, the pins can bend, causing permanent damage.
Step 10: Remove the display assembly
")
Remove the display assembly.
During reassembly, pause here to replace the waterproof adhesive around the edges of the display.