If your iPhone 12 mini screen is cracked, unresponsive, or doesn’t display anything after powering on, you can refer to this guide to restore your iPhone to normal use by replacing the screen (the display assembly).
The earpiece speaker and sensor components, located on the back of the display assembly, are paired with your iPhone at the factory. Therefore, when replacing the display assembly, you must transfer these components from the old display assembly to the new one.
If this component is damaged or replaced, Face ID will not work. Therefore, handle this process with extreme care to avoid damaging these components. If the component is damaged, only Apple or an Apple Authorized Service Provider can restore Face ID functionality.
Note: In iOS 17.6 and earlier, True Tone display will be disabled after replacing the display assembly, even if a genuine Apple display assembly is used. In iOS 18 and later, you can use Apple’s Repair Assistant to calibrate the new display assembly to restore True Tone display functionality for genuine Apple-purchased display assemblies.
Step 1:Pentalobe Screws

Before beginning, discharge your iPhone’s battery below 25%. A charged lithium-ion battery can catch fire and/or explode if accidentally punctured.
Power off your iPhone before beginning disassembly.
Remove the two 6.7 mm long pentagram screws on the bottom edge of the iPhone.
Step 2: Heat the bottom edge of the iPhone
")
Opening the iPhone display will damage its water-resistant seal. Be prepared to replace the seal before proceeding, or if you are reassembling the iPhone without replacing the seal, avoid contact with liquids.
Heating the bottom edge of the iPhone helps soften the adhesive holding the display in place, making it easier to open.
Use a hairdryer or heat gun to heat the bottom edge of the iPhone for 90 seconds, or until the screen is slightly warm to the touch.
Never use a hairdryer to heat one spot for an extended period.
Step 3: Use a suction cup
")
If you’re using a single suction cup, apply it to the bottom edge of the phone, as close to the edge as possible.
If the display is severely cracked, cover the display with clear packaging tape to allow the suction cup to adhere. Alternatively, you can use very strong tape instead of a suction cup. If all else fails, you can stick the suction cup to a broken sieve.
Step 4: Gently lift the screen
")
Gently and evenly pull the suction cup upwards to create a small gap between the screen and the metal frame.
The plastic frame is fixed to the back of the display and must be lifted along with the display. Inserting a pry tool between the frame and the display will damage the panel.
Insert the open pry tool into the gap below the plastic frame of the screen.
Ensure the pry tool is inserted under the plastic frame (close to the metal frame) to avoid damaging the screen.
Step 5: Heat the right edge
")
Heat the right edge of your iPhone (the side with the power button) with a hairdryer or heat gun for 90 seconds, or until the screen is slightly warm and untouchable.
Step 6: Separate the adhesive on the right.
")
Insert the pry tool into the bottom right corner of the iPhone to loosen the adhesive.
Do not insert the pry tool more than 3 mm into the iPhone, as this may damage internal components.
Step 7
")
The top edge of the display is secured with glue and clips.
Insert the pry tool under the top right corner of the display panel.
Slide the pry tool to the top right corner. You may encounter some resistance due to the clips.
Do not insert the tip of the pry tool more than 3 mm, as this may damage the front panel sensor array.
This step can be slightly simplified by gently pulling the front panel assembly towards the bottom edge of the phone.
Slide the pry tool along the top edge and cut off any remaining glue securing the screen.
Step 8: Separate the adhesive on the left side.
")
Rotate your iPhone so that the right edge faces you.
Rotate the display upwards from the right, like a book cover, to open the iPhone.
Do not attempt to completely detach the display, as several fragile ribbon cables still connect it to the iPhone’s motherboard.
While working on the phone, lean the display against something for support.
During reassembly, position the display in place, align the retaining clips along the top edge, and carefully press the top edge into place before securing the rest of the display downwards. If it doesn’t snap into place easily, check the condition of the clips around the display perimeter and ensure they are not bent.
Step 9: Unscrew the battery and the display screen.
")
Unscrew the 1.25mm Y000 screws to secure the battery and display connector cover brackets.
Throughout the repair process, pay close attention to each screw and ensure it is accurately returned to its original position to avoid damaging your iPhone.
This is a good time to open the iPhone and test all functions during reassembly before resealing the display. Make sure the iPhone is completely powered off before continuing.
Step 10: Disconnect the battery
")
Use a pry bar or clean fingernail to pry the battery connector upwards from the slot on the motherboard.
Try not to damage the black silicone seals around this circuit board and other circuit board connections. These seals provide extra protection against water and dust.
Bend the connector slightly away from the motherboard to prevent it from accidentally contacting the socket and powering the phone during repairs.
Step 11: Disconnect the display cable
")
Use a pry bar or a clean fingernail to pry the OLED panel cable connector upwards from its slot on the motherboard.
To reconnect such a crimp connector, carefully align and press down on one side until it clicks into place, then repeat on the other side. Do not press down on the middle. If the connector is misaligned, the pins will bend, causing permanent damage.
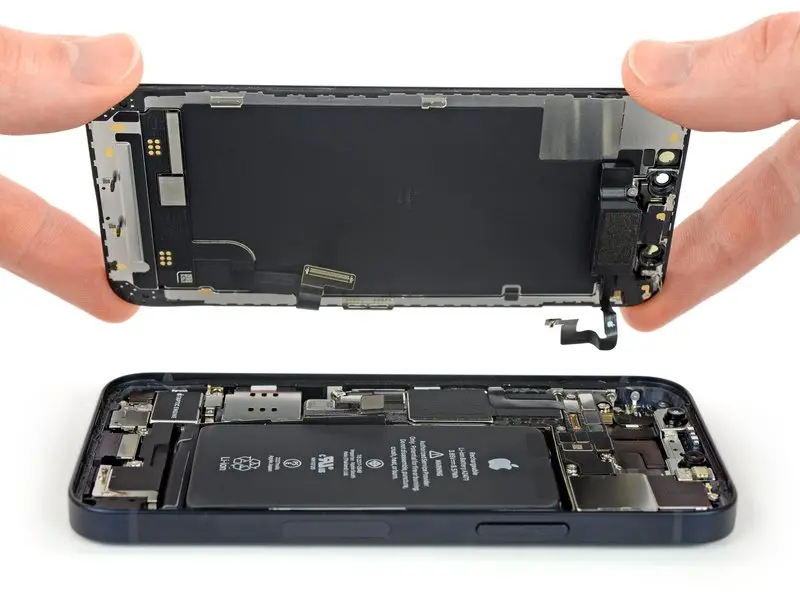
Step 12: Remove the display assembly
")
Remove the display unit.
If you need to replace the waterproof adhesive around the edges of the display during reassembly, please pause here.