Use this guide to repair a cracked or damaged screen on your iPhone SE 2022 by replacing the front panel (i.e., the LCD and touchscreen assembly).
If the phone frame is warped, replace the frame before replacing the screen to ensure the new screen installs correctly and isn’t damaged by uneven pressure.
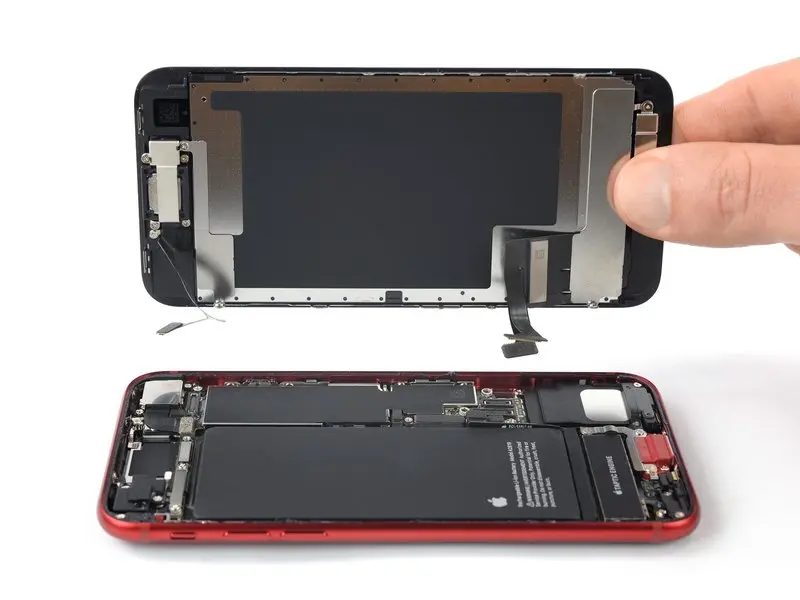
This guide only shows how to replace the iPhone SE 2022 LCD and touchscreen assembly (i.e., the “front panel”). Therefore, you’ll need to transfer several components from the original screen to the new screen before installing the new one, including the front-facing camera, earpiece, LCD cover, and Home button assembly.
To retain Touch ID functionality, transfer the original Home button/Touch ID sensor to the new screen. The Home button is paired with the motherboard at the factory, so replacing it with a different Home button will cause this function to malfunction.
If you don’t replace the adhesive strips during reassembly, your device will function normally, but you will likely lose its water resistance.
During device reassembly, you will need to replace the adhesive to reconnect the components.
Step 1:Pentalobe Screws

Please turn off your phone before removing the screws.
Remove the two 3.4 mm long P2 pentalobe screws at the bottom of the phone.
Step 2: Insert the triangular pry bar.
")
Secure the suction cup to the lower half of the front panel, as close to the Home button as possible.
Use the suction cup to lift the screen, creating a small gap between the screen and the phone frame.
If you have difficulty creating this gap, apply more heat to the lower half of the screen. Please follow iOpener’s user guide to avoid overheating.
Insert the pry tool into the gap created under the screen bezel.
Step 3: Cut open the glue
")
Use the triangular pry tool to cut the glue on the screen by sliding it to the bottom right corner of the phone.
Insert a second triangular pry tool at the bottom of the phone.
Slide the triangular pry tool to the bottom left corner to cut the glue.
Leave the triangular pry tool in place to prevent the glue from resealing.
Step 4: Lift the screen
")
Remove the triangular pry bar.
Gently pull up the suction handle to lift the bottom of the screen.
Do not raise the monitor more than 15º, otherwise you may damage the ribbon cable connecting the monitor.
Remove the suction handle.
Step 5: Cut open the remaining glue.
")
Insert the triangular pry tool below the top left corner of the display.
Move the triangular pry tool along the top left corner and top of the phone to cut away any remaining glue.
Step 6: Lift the screen
")
Open the phone by flipping the screen from the left, like turning the pages of a book.
Do not attempt to completely separate the display from the phone components at this point, as the screen is still connected to the motherboard by several fragile ribbon cables.
When repairing the phone, prop the flipped-up screen against another object to keep it upright.
Step 7: Unscrew the screws on the lower screen cable cover.
")
Remove the four Phillips head screws securing the lower screen cable cover:
Two 1.2 mm long screws
Two 2.8 mm long screws
Throughout the process, confirm the position of each screw to ensure they are returned to their original positions during reassembly. Installing screws in the wrong position can cause permanent damage.
Step 8: Disconnect the battery.
")
Use the tip of a pry bar to pry the connector directly upwards from its socket, thus disconnecting the battery.
Step 9: Disconnect the monitor and touch screen sensor cables.
")
The display and touchscreen sensor ribbon cables are stacked on top of each other. To avoid damaging the cables, disconnect the upper ribbon cable first; never attempt to disconnect both simultaneously.
Use the tip of a pry bar to pry the connector upwards from its slot, thus disconnecting the two bottom ribbon cables.
To reconnect this push-button connector, carefully align and press down on one side of the connector until it clicks into place, then repeat on the other side. Do not press down on the middle of the connector. If the connector is misaligned, the pins may bend, causing permanent damage.
Step 10: Remove the screen
")
Remove the screen.